MAGAZINE ISSUE 4
Kustom Korner: Buzzsaw (Booster X10 repaint)
By: Peter “Pierrimus” Phelps
First off, let me just state how much I detest the fact that the original toy is given such a dumb name. This is Laserbeak not Booster X10 and I don't know why Hasbro allowed the marketing people to give the toys such goof ball names in the first place when there are literally hundreds of great names to choose from. Off my high horse and on to the real article here. By the pictures coming out of BotCon 2007 it looks as if Hasbro's already about to release a repaint of this toy perhaps as their Buzzsaw homage, but I do not like the blue used on that toy. <EDIT: Saw that this toy is actually going to be an Autobot called Night Beat 7 today, 7/6/07. I think Hasbro needs to get a new marketing team in there that can recognize that the old G1 characters would be selling points rather than letting them butcher the characters themselves. I don't see the point in this repaint they made and it sure doesn't make sense for Night Beat to not be a police car again. If there was a character that I would have used it would still have been a Decepticon and I'd have called it Divebomb. >
 To
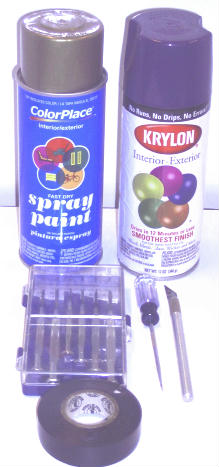
start off with I bought one extra Booster X10 toy, then for a
materials list it was One can cheap ColorPlace gold paint which was
bought at Walmart. One can Krylon violet paint purchased at Home
Depot. A set of small screwdrivers, both standard and phillips. One
Exacto knife. One small pointed tip punch. Then a roll of standard
electrical tape to be used for masking purposes.
To
start off with I bought one extra Booster X10 toy, then for a
materials list it was One can cheap ColorPlace gold paint which was
bought at Walmart. One can Krylon violet paint purchased at Home
Depot. A set of small screwdrivers, both standard and phillips. One
Exacto knife. One small pointed tip punch. Then a roll of standard
electrical tape to be used for masking purposes.
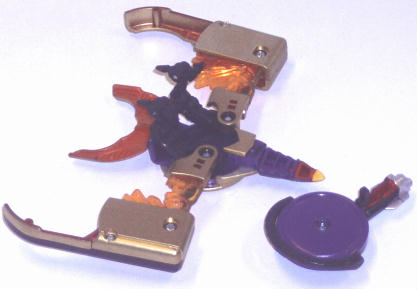
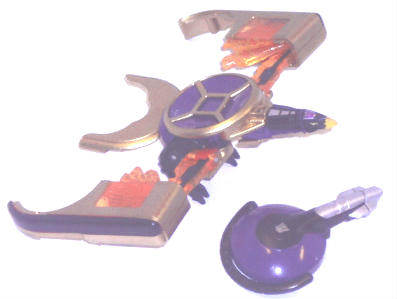
 Disassembly
of
the
toy is fairly straight forward, I only ran into a couple of
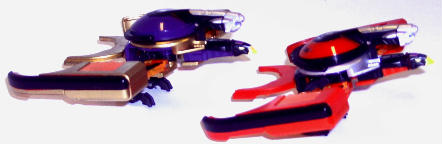
small glitches. You will note in the two pictures below that you can
see all of the screws on his wings. This is for two reasons: one I
lost two out of the four plugs/caps that went in them, second the
third was rather decimated due to the fact that it had been super
glued in so well that I practically dug the thing out. This problem
continued on to also make it difficult to get the screw in that hole
out. I ended up stripping the head and was only fortunate that a
standard screwdriver was able to get it out. (At some future point I
might find some type of automotive putty to fill over the holes, but
he's good for now.) To get to the screw that holds the main body
together you need to remove the small red piece at the base of the
neck. It is not held on by much, just two small dowel pieces that
make it easy to pry off. I was amazed to discover how the neck is put
together. The entire head is held on just by the small amount of
pressure the two body pieces exert when it is screwed together.
Normally this type of setup would have had some kind of keeper piece
that was larger than the hole, but if you tug real hard you can pull
his head off without much effort even when it is together. There are
two screws holding together the leg/wing assembly to the body. I
would suggest using a tray or box to place all of the misc. parts
that will be laying around. These screws are a different size than
the others and you might want to make sure you know which go where.
When you disassemble the wings, you should also do the same as the
little orange feather pieces are put together a certain way and you
want to put them back the same way. (I did not do this and even when
I went back to look at the Laserbeak toy I was hard pressed to try to
come up with an exact match. All of the parts have a letter combo
printed in them to identify where they are supposed to go, but
somehow they did not match exactly between the to toys??? The
Laserbeak toy I have says for the left wing: AL, BL, then for the
right: AR1, AR. When I assembled Buzzsaw I ended up with: left wing:
BL1, BR, right: AR1, AL. Now that I've compared again I think I see
what threw me. L=left R=right, B=bottom A=top?) It's easier if you
make note of what should be where...trust me.
Disassembly
of
the
toy is fairly straight forward, I only ran into a couple of
small glitches. You will note in the two pictures below that you can
see all of the screws on his wings. This is for two reasons: one I
lost two out of the four plugs/caps that went in them, second the
third was rather decimated due to the fact that it had been super
glued in so well that I practically dug the thing out. This problem
continued on to also make it difficult to get the screw in that hole
out. I ended up stripping the head and was only fortunate that a
standard screwdriver was able to get it out. (At some future point I
might find some type of automotive putty to fill over the holes, but
he's good for now.) To get to the screw that holds the main body
together you need to remove the small red piece at the base of the
neck. It is not held on by much, just two small dowel pieces that
make it easy to pry off. I was amazed to discover how the neck is put
together. The entire head is held on just by the small amount of
pressure the two body pieces exert when it is screwed together.
Normally this type of setup would have had some kind of keeper piece
that was larger than the hole, but if you tug real hard you can pull
his head off without much effort even when it is together. There are
two screws holding together the leg/wing assembly to the body. I
would suggest using a tray or box to place all of the misc. parts
that will be laying around. These screws are a different size than
the others and you might want to make sure you know which go where.
When you disassemble the wings, you should also do the same as the
little orange feather pieces are put together a certain way and you
want to put them back the same way. (I did not do this and even when
I went back to look at the Laserbeak toy I was hard pressed to try to
come up with an exact match. All of the parts have a letter combo
printed in them to identify where they are supposed to go, but
somehow they did not match exactly between the to toys??? The
Laserbeak toy I have says for the left wing: AL, BL, then for the
right: AR1, AR. When I assembled Buzzsaw I ended up with: left wing:
BL1, BR, right: AR1, AL. Now that I've compared again I think I see
what threw me. L=left R=right, B=bottom A=top?) It's easier if you
make note of what should be where...trust me.


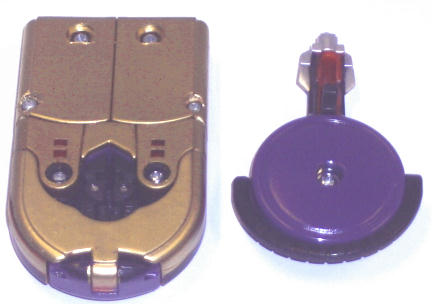
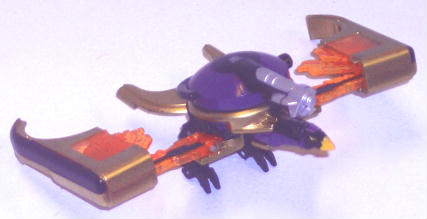
I did not pound out any of the pins, my attempt to do so with the pointed spike ended up bending the tool. Instead I ended up masking each piece at a time and painting them. A note, the gold paint was much more fast to the plastic than the violet. I painted the keypad part first and then masked it off to paint the gold onto the tail, only to have the violet come off when I removed the electrical tape. Thus I had to paint the keypad again. (This is why the features on the keypad part seem to be lower than they should.) You can probably see a couple of imperfections in my masking job: especially around the black wing sections and the red-into-gold section of the earpiece.)

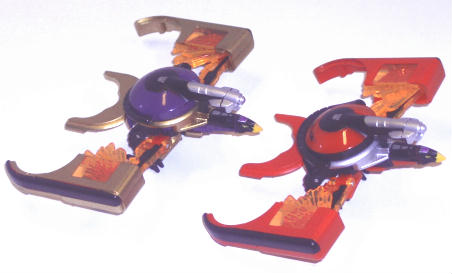
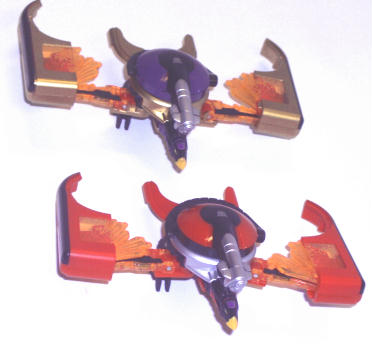
Either my mess up with the wings or just the fact that there's paint applied has made it so the toy does not fully flush together in MP3 player mode as you can probably tell from the above image. Here's another image from the work done to this toy followed by a small set of comparison shots:
I have a Windows Media (.wmv) video of the toy spinning about. It's a 789 kb file that lasts 28 seconds. No sound to it. If anyone's interested in seeing it let me know by email and I'll send it to you. Hope you like.


The Transmasters club is a nonprofit organization. Transformers is Copyright and Trademark 2007 Hasbro/Tomy, all rights reserved.